

| Taping | | Premiere | | After Effects | | Final Cut Pro |
Shadowrama is the common name for the use of Lumakey, or Chromakey to create the silhouette used on “Mystery Science Theater 3000.” In it, three characters are superimposed over top of an old movie, which they are watching and providing a running commentary on. The technology used to create this effect is both inside of the camera, through fooling the auto iris and exposure, and in the computer, where the keying is done. As you may already know, to achieve a clean image, the characters never sat in front of an actual movie screen, rather they sat in front of a white (or colored) sheet, which was later keyed out and replaced with the movie. J/M&TB watched the movie on small television screens that were placed on the ground in front of them.
From KTMA through the end of Season 3, the sheet that they sat in front of was either blue or green colored, and Editor Tim Scott would use chromakey to remove the green color and replace it with the movie. Chromakey is the green/blue screen technique used most frequently in your nightly weather report on the local news in which a weathercaster stands in front of a green wall and the green is digitally replaced with animated weather pattern maps. While chromakey worked, it often could often have undesirable effects if instituted improperly (such as Crow's vanishing hockey mask, and Servo's 'gap' in 101.) When season 4 started, BBI switched and started using 'Lumakey', which is based not upon color, but luminance, or the varience between white and black (grayscale.) This meant that BBI switched to a white sheet, and was able to achieve a much cleaner movie transfer with less lighting. For our tutorial, we will be using lumakey as it is a much easier, and much cheaper effect to acheive, and again, it provides a cleaner image.
In our scene, two characters are seen viewing the 1948 short film “Duck and Cover.” Duck and Cover, by the way, is available, free via Prelinger archives here along with literally thousands of other old short films.
| Taping | | Premiere | | After Effects | | Final Cut Pro |
 The first thing filmed was the actual riffing segment.
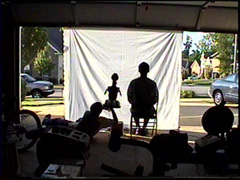
For our purposes, the goal was to spend as little money as possible, and as a result we achieved the effect by suspending a white sheet from the ceiling of an open garage and pointing the camera at it.
The immense amount of sun light entering the camera from outside of the garage compared to the minimal amount of light inside of the garage confuses the cameras internal circuiting and makes it look as though there is little to no light inside of the garage, thus creating the ‘shadow’ effect.
The small ripples in the sheet, while they seem as though they could create problems in keying, are no match for the powerful keying tools of Premiere and After Effects.
The first thing filmed was the actual riffing segment.
For our purposes, the goal was to spend as little money as possible, and as a result we achieved the effect by suspending a white sheet from the ceiling of an open garage and pointing the camera at it.
The immense amount of sun light entering the camera from outside of the garage compared to the minimal amount of light inside of the garage confuses the cameras internal circuiting and makes it look as though there is little to no light inside of the garage, thus creating the ‘shadow’ effect.
The small ripples in the sheet, while they seem as though they could create problems in keying, are no match for the powerful keying tools of Premiere and After Effects.
A small television screen is placed in front of our actors playing back the short, while they read their riffs off of a script. If a television screen is not available, you can record the audio track onto a cassette and play it back on a tape recorder, making your riffs based upon aural clues, but this requires good timing on the part of your actors and is such, more difficult.
This is the same type of effect that happens when you take a picture of someone when they are standing against a window on a sunny day. The person ends up becoming completely washed out and the window is overexposed. We are essentially taking advantage of a fluke present in all camera optical CCD's.
As is obvious, We weren't shooting at a 1 to 1 scale. This is because neither the sheet nor the garage was large enough. This is where computers become a great advantage as they allowed us to digitally cut and paste our characters into the scene.
After Effects 5.0 Instructions:
After capturing the scene, import the shadow illusion scene as well as Duck and Cover into After Effects. As the short is only available in MPEG, you may find it to your advantage to convert it to an avi using Virtual Dub (free download) first, as Adobe products do not seem to like MPEG files very much. Drop the short onto the timeline and then place the shadowed scene overtop of it and synchronize the tracks. Right now, the shadow scene will completely overlap the short, making it invisible. To setup the illusion of a theater, first we will apply a mask onto the shadow scene so that only the desired portion of it will be visible.
To do this click:
Layer -> Mask -> New Mask
A yellow box will appear around the shadow layer; double click on one of the box edges so you can drag and crop the edges of your scene until only the desired portion of the scene remains. This is the great advantage of AE over Premiere, it shows you what your output of this mask will be without having to render the entire file, so if you have made a mistake, it is immediately apparent.
Now drag the clip to the lower right hand corner of the screen, positioned in similar locations to where M/J&TB sat. We still have the sheet visible at this point, so now we need to key it out. If we were working with a blue or green screen, we would use a "linear color key," but as we are not, ‘Lumakey’ will be selected from the keying menu.
Effects -> Keying -> Lumakey
 Select “Key out brighter” from the effects box and adjust the threshold until the shadowed characters are all that is visible.
You can also adjust the ‘edge feather’ to eliminate the harsh character edges.
Select “Key out brighter” from the effects box and adjust the threshold until the shadowed characters are all that is visible.
You can also adjust the ‘edge feather’ to eliminate the harsh character edges.
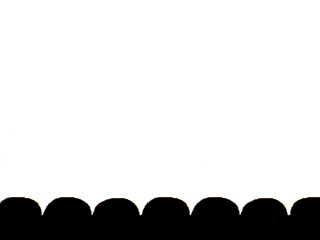
At this point, the Duck and Cover short is fully visible, and only the desired portions of our characters are, but as we did not build theater seatbacks, you can see the folding chair that our lead actor is sitting in, and the arm of our puppeteer. What we will do now, is take any of the freely available JPEG images of the theater seats from the internet (or this one here), and overlay it on top of the sceen. Add another “Key out brighter” lumakey onto it to leave only the seats, move it to the lower right corner to line up the seat backs with the characters, and you have successfully created your very own Mystery Science Theater, and only for the cost of a white sheet.
Premiere 6.0 Instructions
It is many times easier to create the effect inside of After Effects, so if you have it available to you, using it will make your life much easier. But, if AE is unavailable, the effect can be created inside of Premiere, although it involves several more steps. After you have captured the shadow clip, drop it, and Duck And Cover onto the Premiere timeline and synchronize the tracks.
The short should be on Video 1, with the shadow clip on Video 2. Right click on the shadow clip and go to:
Video Options -> Transparency
The Luminance and Chroma tools in Premiere are not nearly as effective at this effect, no pun intended, so we will select "RGB Difference" from the drop down menu. You will have to adjust the "Similarity" slider so that that short shows through completely. Change the "Smoothing" drop down to either "Low" or "High" based on your preference. In the small preview window for the effect, there are tiny square boxes at each corner; click and drag on each of those boxes to move the masking for the effect until only our characters are visible. Click OK to apply the step; now we have to adjust the clips position on the screen.
Right click on the shadow clip and go to:
Video Options -> Motion
First we have to stop the clip from scrolling. Click on the box that says "-80" and change the value to "0." Click and drag the triangular "Time" slider to the end of the clip, and go back to the Info box that now says "80" and change it to "0" again. Now you have to adjust both of the "Info" values (actually position values, don't ask me why Premiere calls them "Info") manually by entering numeric values until the X-Y coordinates are correct and the clip is aligned in the lower right hand corner. You have to do this at both the beginning, and the end of the timeline, else the motion box assumes you want the clip to animate motion, which we do not.
Hit Ok and you are done the first portion of this effect, our characters are successfully overlaid onto the main clip. At this point you only, however, have a fairly good estimate as to where the clip actually lays, as in order to see the full view, it must be rendered. So that we can tackle any and all problems at one time (after rendering) we will now add the theater seat backs. Import the JPG for the seats, and right click on any part of your timeline that does not contain a clip and select "Add Video Track." Drop the theater seats clip onto the newly created "Video 3" track and stretch out the duration of the JPG to match the length of your short. We will once again be using RGB Difference in the Transparency settings, so just repeat the above Keying instructions for this clip. You now are, hopefully done.
Hit the "Enter" key to build a preview of your show. If everything lines up perfectly, then you are done; most likely however, as we were using Premiere's rather crude motion and keying tools, the clips have small problems (My seat backs did not line up accurately until the 4th time I corrected them.) Keep readjusting clips and building a preview until you reach your desired effect and you are done! It took a bit more elbow grease, but it is fully possible to create your very own MST3K completely inside of Premiere.
Final Cut Pro HD 4.5:
Available only for the Mac, Final Cut is an interesting amalgamation of both Premiere and After Effects. It offers some of After Effect's more advanced functionality, while at the same time retaining more of the straightforwardness of Premiere. While I personally recommend Adobe software over Final Cut, creating the shadowrama is almost as easy in Final Cut as it is in After Effects. Like the Premiere and AE instructions, this project expects that you already have a basic understanding of Final Cut Pro.
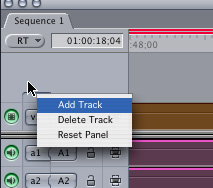
Capture your theater segment into Final Cut, and import your movie segment, and the theater seats (available here.) Lay your movie segment to be riffed on down on the timeline. You'll need to add two video tracks (one for the seats, and one for the theater.) Control click in the area around the 'v1' label in the Sequence box, and select 'Add track.' Place the theater seats on track 3, and your riffing segment on track 2. Now that you've set both your theater segment, and your movie down on the timeline, adjust the starting points of the clips until the riffs match up with movie.
 Right now, all of your clips are simply centered in the timeline.
We need to scale and move them around, so we need to enable the feature that allows that to happen.
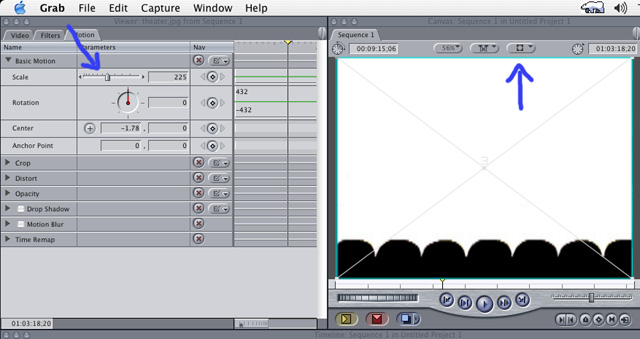
In the Canvas window, toward the top and centered are three oval shaped buttons.
Click and hold on the one that looks like a picture frame.
This will be the furthest button on the right.
Select 'Image + Wireframe.'
Now scale up the theater seats so that they fill the entire screen.
Double click the theater seats on the timeline, then click the 'Motion' tab in the Viewer.
Adjust the scaling as needed (if you've used a video from Prelinger Archives, you will probably have to do this for your movie as well, as they all seem to be in strange aspect ratios.)
Right now, all of your clips are simply centered in the timeline.
We need to scale and move them around, so we need to enable the feature that allows that to happen.
In the Canvas window, toward the top and centered are three oval shaped buttons.
Click and hold on the one that looks like a picture frame.
This will be the furthest button on the right.
Select 'Image + Wireframe.'
Now scale up the theater seats so that they fill the entire screen.
Double click the theater seats on the timeline, then click the 'Motion' tab in the Viewer.
Adjust the scaling as needed (if you've used a video from Prelinger Archives, you will probably have to do this for your movie as well, as they all seem to be in strange aspect ratios.)
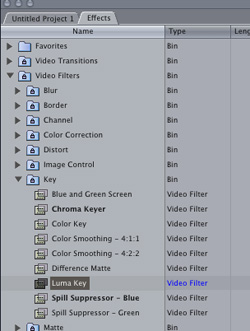 To remove the white background in the theater seats JPG, click 'Video Filters' in the Browser window.
Scroll down to 'Key', and then click and drag the 'Luma Key' over onto your theater seats clip.
With the theater seats clip selected, click 'Filters' in the Viewer window.
Drop down the 'Video Filters' line, then drop down the 'Luma Key' line.
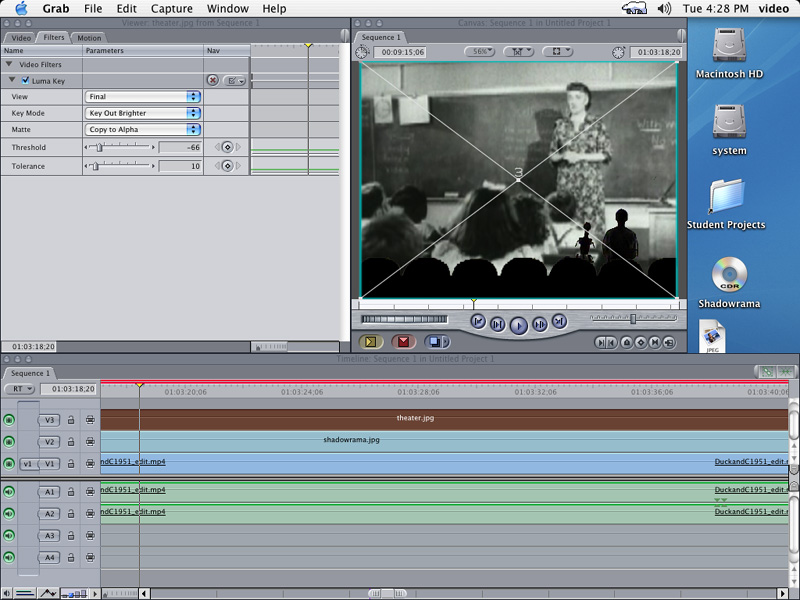
Change the Key Mode to 'Key Out Brighter', and the Matte to 'Copy to Alpha.'
You will probably need to mess around with the Threshold and Tolerance levels to perfect the seats, but I used -66, and 10, respectively.
To remove the white background in the theater seats JPG, click 'Video Filters' in the Browser window.
Scroll down to 'Key', and then click and drag the 'Luma Key' over onto your theater seats clip.
With the theater seats clip selected, click 'Filters' in the Viewer window.
Drop down the 'Video Filters' line, then drop down the 'Luma Key' line.
Change the Key Mode to 'Key Out Brighter', and the Matte to 'Copy to Alpha.'
You will probably need to mess around with the Threshold and Tolerance levels to perfect the seats, but I used -66, and 10, respectively.
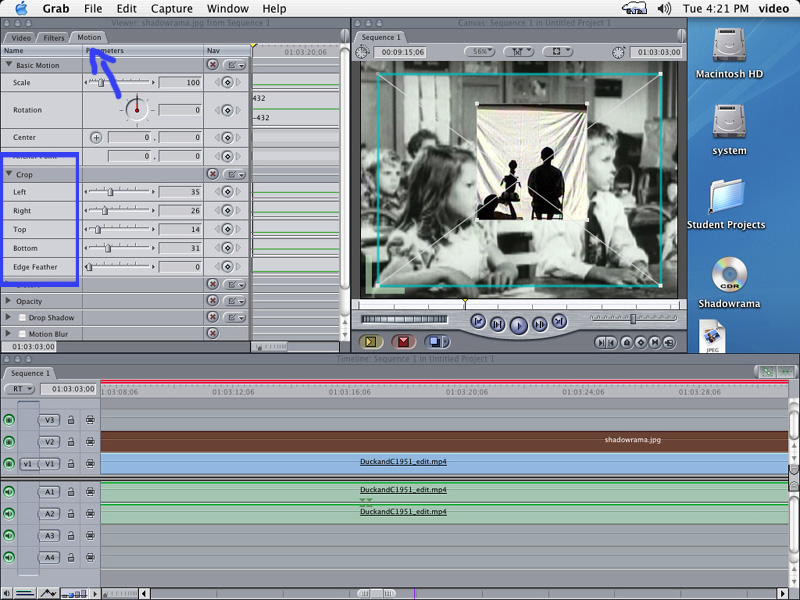 We will be using the Luma Key again on the riffing segment, but first we need to crop the clip.
Double click on your theater segment on the timeline, then click on the 'Motion' tab in the Viewer window.
Drop down the 'Crop' box, and manipulate the sliders for Left, Right, Top, and Bottom until you've formed a medium sized box around your characters.
If you shot a correctly scaled, full sized theater, this cropping will not be necessary, but with bedsheet technology, this step is required.
If your meatpuppet walks in with Tom Servo at the beginning, make sure to provide enough lead room so that the characters don't suddenly appear out of nowhere.
For my segment, I setup keyframes so that the theater segment was cropped less on the right hand side at the beginning, and then became a tighter box.
I did this because I had trouble perfectly keying out the right hand side of the sheet without partially keying out our characters.
At this point, you can position your theater segment in the lower right hand corner so it lines up with the seats.
You may find that you need to scale up, or scale down your theater segment so that your characters line up with the seats correctly.
We will be using the Luma Key again on the riffing segment, but first we need to crop the clip.
Double click on your theater segment on the timeline, then click on the 'Motion' tab in the Viewer window.
Drop down the 'Crop' box, and manipulate the sliders for Left, Right, Top, and Bottom until you've formed a medium sized box around your characters.
If you shot a correctly scaled, full sized theater, this cropping will not be necessary, but with bedsheet technology, this step is required.
If your meatpuppet walks in with Tom Servo at the beginning, make sure to provide enough lead room so that the characters don't suddenly appear out of nowhere.
For my segment, I setup keyframes so that the theater segment was cropped less on the right hand side at the beginning, and then became a tighter box.
I did this because I had trouble perfectly keying out the right hand side of the sheet without partially keying out our characters.
At this point, you can position your theater segment in the lower right hand corner so it lines up with the seats.
You may find that you need to scale up, or scale down your theater segment so that your characters line up with the seats correctly.
 When I moved the clip down into the corner, I realized that my characters weren't quite black.
They were close, but the variation in colors was noticable.
To compensate, I applied a Gamma Correction to the clip.
This effect can be found in the Browser, under Video Filters -> Image Control -> Gamma Correction.
I set the filter to '4.'
Apply a Luma Key to the clip, and set the Key Mode to 'Key Out Brighter' and the Matte to 'Copy to Alpha.'
For this clip, I set the Threshold to -47 and the Tolerance to 23, but your mileage may vary.
When I moved the clip down into the corner, I realized that my characters weren't quite black.
They were close, but the variation in colors was noticable.
To compensate, I applied a Gamma Correction to the clip.
This effect can be found in the Browser, under Video Filters -> Image Control -> Gamma Correction.
I set the filter to '4.'
Apply a Luma Key to the clip, and set the Key Mode to 'Key Out Brighter' and the Matte to 'Copy to Alpha.'
For this clip, I set the Threshold to -47 and the Tolerance to 23, but your mileage may vary.
Believe it or not, at this point you're ready to render. Render the clip and watch it all the way to the end to make sure that there aren't any weird problems that crop up halfway through the clip. Once everything is as you want it, Print to tape, and your done.
Go Home
Tutorial from the instruction booklet that accompanied "Cinematic Illusions: Movie spfx" a Classic Arrow Production.
Original Tutorial ©2002 Jeff Zehnder
Tutorial Revisions ©2003 Classic Arrow Inc.
Final Cut Pro Tutorial ©2005 Classic Arrow Inc.
Page Design and Layout ©2003 - 2005 Kjo 2000 Graphics
Original Tutorial ©2002 Jeff Zehnder
Tutorial Revisions ©2003 Classic Arrow Inc.
Final Cut Pro Tutorial ©2005 Classic Arrow Inc.
Page Design and Layout ©2003 - 2005 Kjo 2000 Graphics
Site Design ©2003 - 2005, 2015 Kjo 2000 Graphics
Mystery Science Theater 3000 ©1989 - 2015 Best Brains Inc.
All Other Rights Held By Their Respective Owners
Email Us